The paging file is often a hot but overlooked topic that when configured properly it would not only smooth out overall the performance but also save us a lot of disk space at the end. Most of us leave it to Windows to manage to phrase out the best practice for our Windows system because, well, we all trust its expertise, don’t we? While it does allow you to run the system without worrying about the size of the page file in most situations, there are also two potential issues that are often overlooked,
- Disk space – on a system with a lot of RAM installed the page file will be huge.
- Pagefile fragmentation – if the page file expands and shrinks it can cause disk fragmentation and poor performance.
Therefore, manually configuring the page file for your system is recommended, especially when you have tons of RAM installed.
The basics
Modern Windows manages its memories based on Virtual Memory, meaning that each process has its own private virtual address space. When the system is running low in memory, Windows will move the least used memory pages to a hidden file called the Page File.
The page file is a special file used by Windows to store modified memory pages, and the process of moving pages from RAM to the Page file is called Paging. A page file has two main roles:
- Physical extensions of RAM that stores modified data
- Record information about the state of the system in case of a system crash (Memory dump)
Because of these, here are the reasons why having a page file is important:
- If your computer exhausted all physical RAM and you don’t have a page file, your application will crash or hang because Windows is unable to allocate more memory.
- Without a page file or insufficient size of a page file, Windows can’t do a proper memory dump. Without a memory dump, you will not be able to do in-depth troubleshoot to get the bottom of the problems that cause your computer crash.
Sizing the page file
If you are in the IT field long enough, you have probably already heard of this rule of thumb “page file size = RAM * 1.5 or RAM * 2“. Well, it’s no longer applied to the modern systems anymore, because:
- It’s an old 32-bit of world rule that makes no sense in a 64-bit world.
- Tthe real logic between RAM and a Page File should be like this: the more RAM you have, the less you need in the page file.
So, how much exactly should you size a page file?
Well, unfortunately, there is no magical number here that will fit any system and any workload. It really varies but here are a few scenarios for you to consider when sizing a page file on a Windows client system, like Windows 7, 8.1, and 10.
- If you have lots of RAM installed (>8 GB) and don’t care about memory dump, you can safely disable paging file.
- If you do consider having a memory dump for troubleshooting purpose, set at least 1 GB for Small Memory Dump, 2 GB for Kernel Memory Dump, and the same amount for Complete Memory Dump. In most cases, the Kernel Memory Dump is good enough for root cause analysis.
- If you have the small amount of RAM installed (<4 GB), you should still consider using the old rule of thumb, 1.5 or 2 times the amount of RAM installed.
Note #1: the numbers used here are NOT Microsoft official recommendation but based on my own study and experience.
Note #2: these are the recommendations for Windows client operating system, not for the servers. There are more factors to consider when sizing a page file in a server environment.
Where to put the page file?
If you have two physical disks installed, it would be a good idea setting the page file on a second disk that doesn’t have Windows system installed so that it won’t impact the system performance during the paging. Theoretically, you would only benefit having a page file when your system is running in low memory, in which case Windows will start moving low usage memory pages to the pagefile.
How to configure the page file?
You can configure Page File through System Properties (press Win + R to open Run box, type sysdm.cpl and hit Enter).
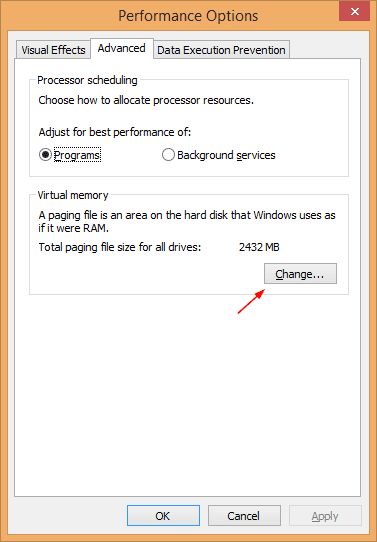
Go to Advanced tab, click Settings button in the Performance section. The Performance Options window pops up. Go to Advanced tab and click Change… button in Virtual memory area
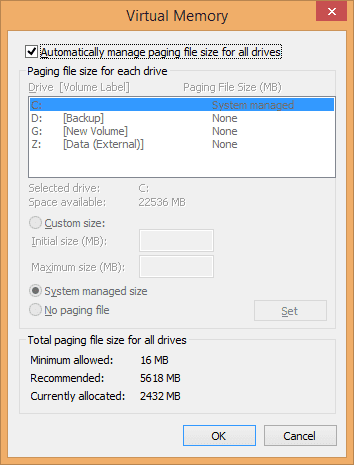
Now we are finally at the place where we can tweak things around. Let’s take a look what the options are:
Uncheck “Automatically manage paging file size for all drives” option if you want to configure the page file by yourself. Once unchecked, pick a drive from the list on which you want to put on the page file. Yes, you can actually set different page files on different drives but most of the time, setting up one on one drive is good enough.
Then, there are three options for you to choose from:
- Custom size – allows you to manually configure the size of the page file.
- System managed – this is the default option and recommended by Microsoft.
- No paging file
As I mentioned earlier, it’s ok without having a page file in place. It can potentially save you tons of disk space as a result. But, unless you are certain that none of your applications requires one, it’s probably still a good idea and certainly wouldn’t hurt having one in place with the size of 1 or 2 GB.
Bonus tip – automatically clean up the pagefile
One thing you should be aware is that the page file contains some sensitive information and doesn’t get cleaned up automatically every time the computer reboots. To avoid the potential risk of exposing the data stored in the page file, there is a Group Policy setting that you can enable to automatically wipe out the page file when the system is shut down.
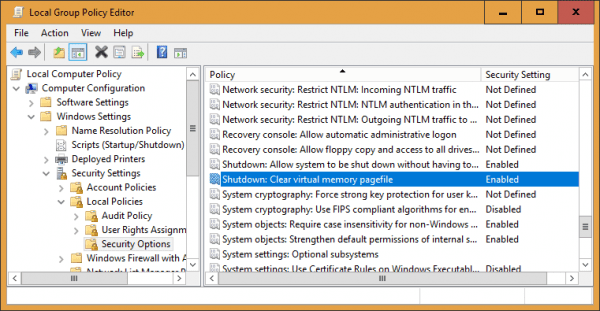
Open Group Policy Editor and navigate to the following location:
Computer Configuration > Windows Settings > Security Settings > Local Policies > Security Options
On the right panel, double-click the policy called “Shutdown: Clear virtual memory page file” and select Enabled. Hit OK to save the change.
What it does is to tell the system to overwrite the existing pagefile data with a bunch of zeros to make it impossible to recover the data from the file. The process is also called “zero-out”.
For those computers that don’t have Group Policy feature. You can also use the registry tweak to do the same.
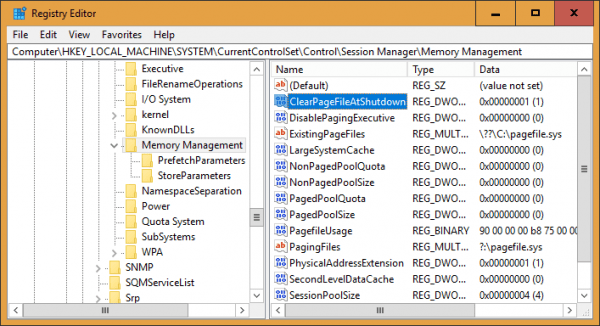
Open Registry Editor and navigate to the following location:
HKEY_LOCAL_MACHINE\SYSTEM\CurrentControlSet\Control\Session Manager\Memory Management
Then create a new DWORD32 Value called “ClearPageFileAtShutdown” and set it as 1.
Reboot your computer and you are all set.


Very nice post Kent
Also:
fsutil behavior set encryptpagingfile 1
I have 8gb ram what should be my initial size and max size I game alot so I need the best performance possible I run Windows 10 i7 core. Please help thank you
I have 16gb using a 4096mb min/max page file