

HDMI is one of the most important cables you may need. It is used to extend your desktop, mirror your screen, or play games and watch movies on a bigger screen. However, some users have encountered a problem with the HDMI port not working in Windows 11.
The most common reasons for this problem are software issues, like faulty drivers or a bad port. This guide will walk you through the most reliable ways of fixing it on your Windows 11 computer. Here we go.
1. Check the Connection
Sometimes, the HDMI port may not seem to work in Windows 11 because you have a very loose connection. Before you proceed with any advanced fixes, you should make sure everything fits tightly.
You may even try the HDMI cable on a different computer to rule out the possibility of cable damage. If the cable is fine and the connection is tight, but the problem persists, move on to other solutions.
2. Clean the HDMI Port
The HDMI port often does not work on Windows 11 because of something as simple as debris blocking the port. You should clean the HDMI port and try again. You may blow dry air through the port to remove debris or particles.
3. Restart the Computer
Incorrect device bootup errors could cause the PC HDMI not to work. You can experience problems with your video or audio output if the system or HDMI device doesn’t load up correctly and produces an error. Restarting the computer or laptop and replugging your HDMI devices might be an option.
4. Update Windows
If you run on an outdated computer, you will risk encountering compatibility issues and conflicts. We recommend an update. An OS update often comes with vital security, bug fixes, and patches.
An OS update may include vital configurations and bug fixes for your HDMI port to fix the problem.
1. Press Windows + I to open the Settings app.
2. Click Windows update on the left pane, then click Check for updates on the right.
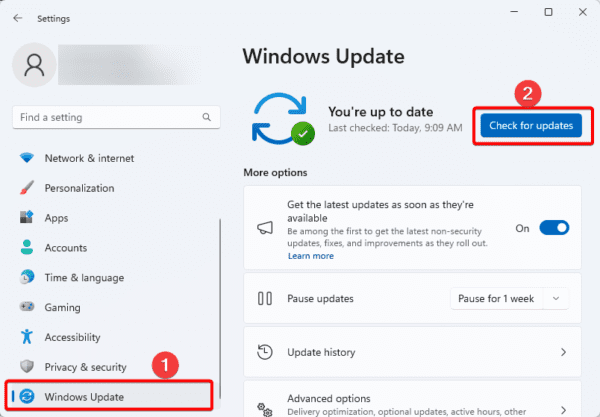
3. Download and install available updates.
4. Roll Back the Windows Update
Updating your computer is always recommended, but there are a few cases where updates may come with certain bugs. If you notice that the HDMI port is not working on Windows 11 just after you update the OS, you should roll back the update.
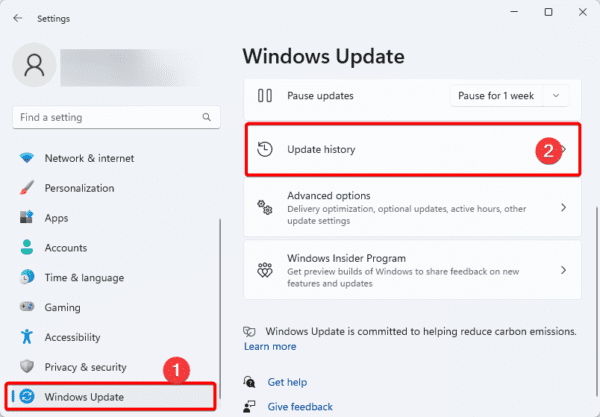
1. Open the Settings app by pressing Windows + I.
2. Click Windows Update on the bottom left pane, then click Update History on the right.
3. Scroll down and click Uninstall updates.
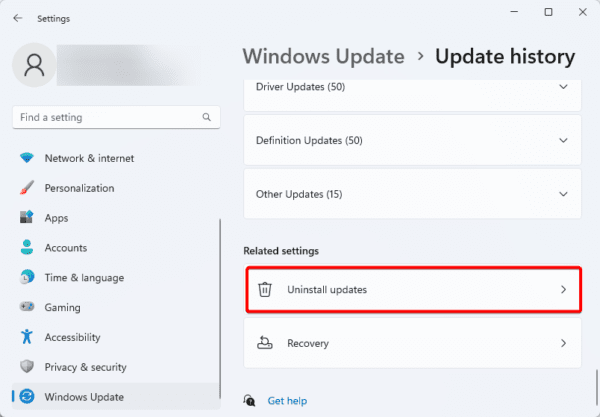
4. Click Uninstall for your latest update.
5. Reinstall your GPU Driver
A few driver-related issues can cause the HDMI port not to work in Windows 11. Some include the following
- An outdated or corrupted driver
- Driver settings
- temporary driver glitches.
If you uninstall and reinstall the driver, you will fix all the above-named problems, and the HDMI port should start functioning again.
Step 1: Right-click on the Start menu and select Device Manager.

Step 2: Expand the Display adapters category, right-click on your driver, and click on Uninstall device.

Step 3: Confirm your choice.
Step 4: Restart the computer and relaunch the Device Manager.
Step 5: Click the Scan for hardware changes option, and a new driver should be installed.

Getting the Best Visual Quality With HDMI
After applying the solutions in this guide, you should get the best quality visuals when using your HDMI cable. If none of the solutions work, it may be a hardware problem, and you may need to change the HDMI unit.
The “clean the HDMI” Solution worked! I tried every damn way first and this was the one. can’t believe it. thanks a million.
Happy it is fixed now