

In Windows 10, if you want to trim or split your video into multiple parts you can now do it natively without any additional third-party tools. It’s a feature existed in the Photos & Videos app, instead of Movies & TV. Depending on your default settings, a video might be opened in Movies & TV app by default. This app doesn’t do anything other than playing and render the video you have selected. To view and edit the video, you need to open the video in another app called Photos & Videos.
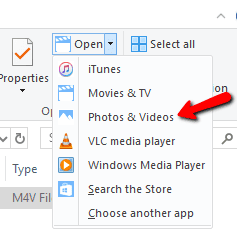
You can select the video and go to Open (or right-click Open with …) > Photos & Videos
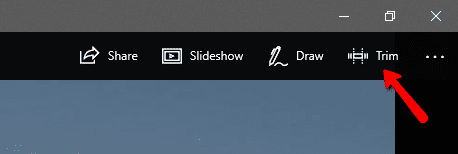
This will render the video in a different app, very similar to Movies & TV. Only this time, the app will have additional controls on the top navigation menu. Notice that there is an icon Trim if it’s rendering a video. To split or trim a given video just click “Trim” and use the handle to select the range of your new video clip.
In my case, I’d like to split the 56 minutes video into two parts, roughly 28 minutes each. Use the handle from the timeline to narrow down the range of the video clip. To split the first part we want to keep the beginning until somewhere in the middle of the clip.
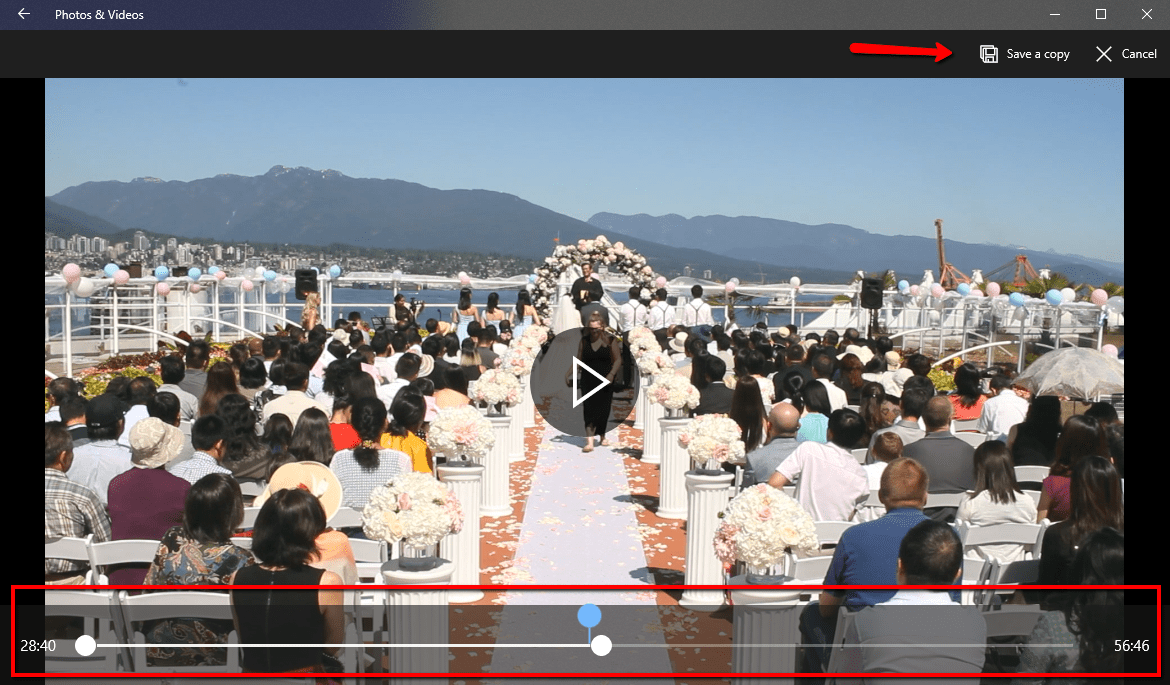
Once you are done selecting the range, click “Save a copy” to create a split or trimmed version of your original video. Don’t worry this will save as a new copy, your original video will not be modified.

From there, if you’d wish to split the remaining part, repeat the same step only this time to select the timeline range handle from the beginning and drag it where you have previously ended the first part of the video.
This is how to split and trim video completely with native built-in Windows 10 apps without any third-party tools from the internet or the Windows Store. Next time when you need to do a quick video editing, think before you start looking for apps to do this. Chances are, Microsoft already ships a tool that just does what you need!
On my system, “Open With…” only displays “Photos”, not “Photos and Videos”, but selecting that still works the same as you described. (Except for .mpg files, which do not offer the “Photos” option, and “Photos” isn’t listed in the full list of “Choose another app”. Codec maybe?).
Also fun, the Draw tool works on videos. The drawing appears for about 2 seconds of the video playback. Now I wish they had included a Text tool.
This didn’t work for me because it doesn’t allow me to save it.
You have to move the white ball markers from the ends to create a new clip. I had the same issue until I tried that… Its not obvious since they show you a gray marker for which I still do not know the purpose.
Thanks for the tip re. the white markers. Totally thought the grey marker did the trimming. Just saved me a big hassle. Thanks again!
This powerful MP4 trimmer can cut files in any format like MP4, MOV, AVI, MKV, VOB, DV, FLV, RMVB, AVCHD, MPEG, M2TS, etc. In addition, there are various output options to let you keep the original file format or convert it to other format.
Why in the everloving hell would something as easy as splitting a video with one click be “upgraded” to a process that takes 4-5 clicks, 2 of which occur after having to find the exact spot as the other. .For a long video with many cuts… This is beyond arduous.
The tool seem do the split! But the splitted file size is bigger than the original file. Is there any setting to reduce the file size?
That’s probably because Microsoft doesn’t want to pay royalties to companies that charge for using their codec. You can, however, use this tool called Handbrake to encode the split video into a smaller size.
On my windows i had to open with photos bot otherwise thanks, it was of great use !!! 🙂 Thanks
Currently the time line is set to minute 00:00 however if I wish to trim within seconds, how to get the video clip time line to show till second 00:00:00
I am trying to split a 55 mb file into 5 10 mb slices. I can trim the first one, but when I try to start from the point the first one ended, to another slice, the second copy starts from the beginning again, any ideas?
you have two slider controller, make sure you adjust the slider for both if you want to cut from anything but the beginning.
That was soooo helpful! I had already started to go down the rabbit hole of searching for a free 3rd party app just to do a simple video split when I came across this post! Be sure to read the previous posts about how to use the sliders. I initially was confused by that too but other users comments got me sorted.
i can split just wont let me save..says I should try save as…but keep getting error of not having permission
The Windows 10 Photos app cannot open my TS video. So I consider using a professional video cutter to cut and split my TS video file. I google TS video cutter and I get Joyoshare Media Cutter from the search results. Such a tool is not totally free but allows 5-time free use. But luckily, I got its lifetime license due to its one-month promotion. Wow!!!
To my great satisfaction, it can split my TS video into several parts with the 100% original quality kept.
Appreciate the guide! Still, I know another easier way to trim videos on Windows 10. My friend recommended me to use TunesKit Video Cutter. It worked well for newbies.
Did I miss the part about how to do the most critical part: “Once you are done selecting the range…”
How do you “select the range” ???
Indeed, this was very helpful information. Try this (and read Step 5 below first) . . .
1) Drag the blue-grey marker circle to the place you want the end of the trimmed video that you are making to be.
2) Then drag the left white circle so that it sits just to the left of that blue-grey circle.
3) Then you can drag the right white circle to the left.
4) Then, it should be visually apparent that the left and right white circles will define the portion that you are trying to keep (everything to the the left of the left white circle and to the right of the right white circle will be “trimmed” (deleted) after you “Save” with a new file name.
5) So basically, after you initially “move” the blue-grey circle, that seems to “activate” the left and right white circles; after that, you can ignore the blue-grey circle.
I truly hope that might be helpful.
Cannot get it to work, after selecting a range and save a copy I have a file wit original range +_trim_mp4~tmp of zero length.