

The PowerShell utility on Windows 11 is an object-oriented configuration and automation tool. It includes a scripting language and a command-line shell. Of the many automation possible, you can rename files with PowerShell, and this guide focuses on all possible ways to use this functionality.
We explore all options, from renaming single files to more complex processes like using wild cats to rename files. Let us get to it.
Prerequisite: Find the File Path
Before going into renaming files using PowerShell, you should be able to find a file path. This is because you will need the path in the commands we explore in this guide. To find a file or folder path, follow the steps below.
Right-click on the file and click Copy as path from the context menu.
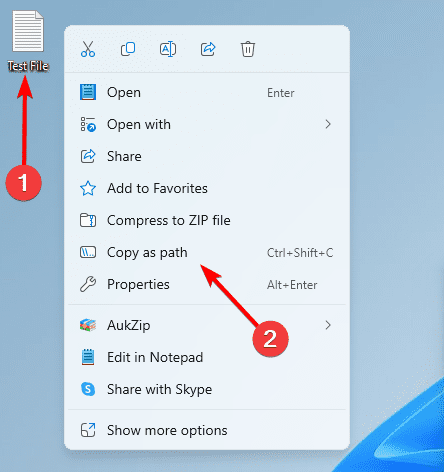
Alternatively, you can click the file or folder and press Ctrl + Shift + C.
1. How to Rename a Single File in PowerShell
To rename a single file, you will make use of the Rename-Item PowerShell command. Follow the steps below:
1. Press Windows + R to open the Run dialog, type powershell, and hit Ctrl + Shift + Enter.
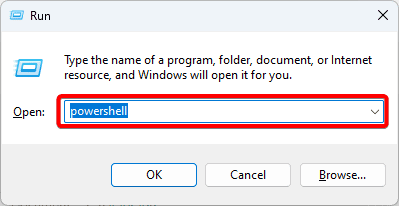
2. Type the command below in PowerShell, substituting file_path for the file’s path and file_name.ext for the file’s new name and extension.
Rename-Item file_path -NewName file_name.ext
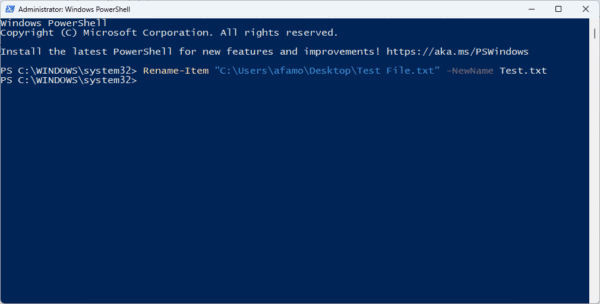
In the example above, we use the following command to rename a file called Test File to Test.
Rename-Item "C:\Users\afamo\Desktop\Test File.txt" -NewName Test.txt
2. Ask For Confirmation Before Renaming A File
While you may change file names without confirmation, as shown in the solution above, you may add a security measure that seeks confirmation before files are renamed.
1. Press Windows + R to open the Run dialog, type powershell, and hit Ctrl + Shift + Enter.
2. Type the command below and hit Enter, replacing file_path and file_name for the actual values.
Rename-Item file_path -NewName file_name -Confirm
3. How to Rename Multiple Files using PowerShell
When renaming multiple files, you may need to use two important commands Get-ChildItem and Rename-Item. The former gets a list of files to rename, and the latter changes the name. Let us show you how they work below.
1. Press Windows + R to open the Run dialog, type powershell, and hit Ctrl + Shift + Enter.
2. Type the command below in PowerShell to replace all spaces in text files in a specified path with hyphens.
Get-ChildItem -Path "C:\Temp" -Recurse -Include "*.txt" | Rename-Item -NewName { $_.Name -replace " ","-" }3. Alternatively, you may enter the command below to replace all old text with new ones in the file name.
Get-ChildItem -Path "C:\Temp" | Rename-Item -NewName {$_.Name -replace "old_name", "new_name"}4. Renaming Folder Files by Assigning an Increasing Number to File Name
You may use this naming convention if you have files with similar names in a folder and want to show some distinction. In the example below, we assign a value of 1 before the first file’s name and keep increasing the numerical value for subsequent files.
1. Press Windows + R to open the Run dialog, type powershell, and hit Ctrl + Shift + Enter.
2. Enter the script below:
Get-ChildItem PATH -Recurse -Include "*.txt" | ForEach-Object -Begin { $Counter = 1 } -Process { Rename-Item $_.FullName -NewName ("{0}{1}" -f $Counter, $.Name) ; $Counter++ }The above script will add the numeric values to the file names in the defined path.
5. Include Timestamps to Files in a Folder
Timestamps are an important element that helps you know when a file was created. Timestamps often include the date and specific hour it was created.
1. Press Windows + R to open the Run dialog, type powershell, and hit Ctrl + Shift + Enter.
2. Tyoe the command below, replacing File_path with the folder’s file path.
Get-ChildItem File_path -Recurse -Include "." | ForEach-Object { Rename-Item -Path $_.FullName -NewName "$($_.DirectoryName)\$($_.BaseName)$(Get-Date -F yyyy-MM-dd_HH-mm)$($.Extension)"}FAQ on Renaming Files With PowerShell
1. How can I rename files using PowerShell?
You can rename files in PowerShell using the abovementioned processes; however, you should note that the Rename-Item is essential to these operations.
2. How do I undo a renaming operation?
Unfortunately, there is no automatic undo operation in PowerShell. However, you must ensure that you take measures to backup files before altering them.
Becoming a Power User With PowerShell
While renaming files is just one of the use cases of PowerShell, it is a good step towards becoming a Power User on Windows 11. One of the more interesting parts is that you may run these PowerShell commands from a remote computer.
Let us know if you have any other cool ways of using PowerShell on Windows 11.