

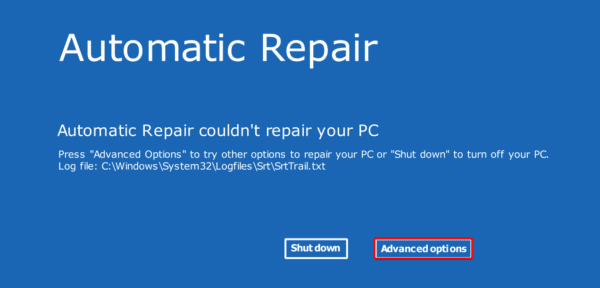
Automatic repair in Windows computers is a tool for diagnosing and fixing boot-up issues on your computer. It attempts to fix issues by initiating the Startup Repair, or in some cases, a System Restore process. However, in a few cases, users got the error automatic repair couldn’t repair their PC on Windows 11.
If you fall into this category where the Automatic Repair tool is not fixing issues, you should try the solution below.
1. Rebuild the BCD and Repair MBR
The Master Boot Record (MBR) is responsible for initiating the boot process, while the Boot Configuration Data (BCD) is a database file that stores information about installed operating systems and boot options. If either is damaged or corrupted, Automatic Repair may not function. Follow the steps below.
1. Click Advanced Options.
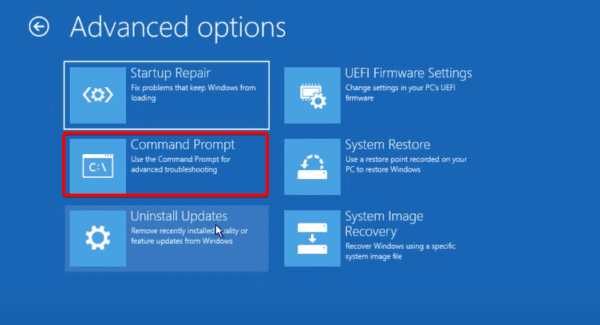
2. Click Command Prompt.
3. Type the following commands, hitting Enter after each one.
bootrec.exe /rebuildbcd
bootrec.exe /fixmbr
bootrec.exe /fixboot
4. If you get an Access denied message while running any of these commands, run the command below first, then retry step 3.
bootsec /nt60 sys
5. Type exit, hit Enter, and click Continue to restart the computer.
2. Repair Bad Drive Sectors with the Check Disk Utility
Bad drives make it impossible for the operating system to find the files needed to complete the Automatic Repair process. This may be why you get the error message: Automatic Repair couldn’t repair your Windows 11 PC.
Fix the drive using the Check Disk utility.
1. Click Advanced Options.
2. Click Command Prompt.
3. Type the following command, hitting Enter to run it.
chkdsk /r c:
4. Type exit, hit Enter, and click Continue to restart the computer.
3. Fix File Corruption with the DISM and SFC Scans
On Windows 11, you may use the DISM and SFC scans to fix corruption with installation files and system files. This corruption may make it impossible for your Automatic Repair process to complete. Hence the error message: Automatic Repair couldn’t repair your PC on Windows 11.
Follow the steps below to repair the bad files.
1. Click Advanced Options.
2. Click Command Prompt.
3. Type the following commands, hitting Enter after each to run the DISM scan.
DISM /Online /Cleanup-Image /ScanHealth
DISM /Online /Cleanup-Image /RestoreHealth
4. Run the following command to initiate a system file repair.
sfc /scannow
5. Type exit, hit Enter, and click Continue to restart the computer.
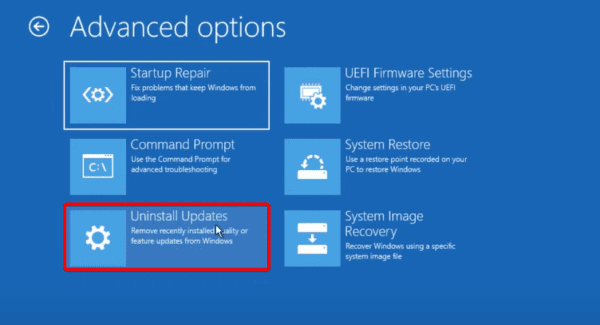
4. Uninstall Windows Updates
You should uninstall the updates if you have just installed certain Windows updates before encountering the problem. They may have bugs that make it impossible for Automatic Repair to complete successfully.
1. Click Advanced Options.
2. Click Uninstall Updates.
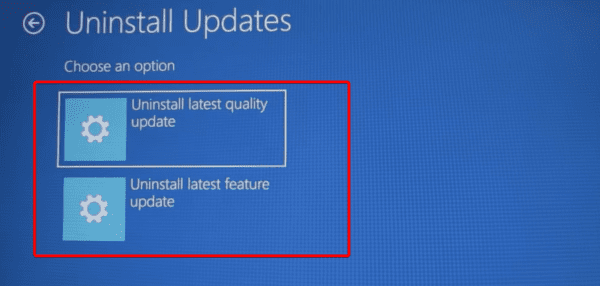
3. Click either Uninstall latest quality update or Uninstall latest feature update, then follow the on-screen instructions to complete the process.
5. Reset your Computer from the Cloud
You may need to reset the computer to fix the Automatic Repair problem. This is because vital files may be corrupted, or certain configurations may stop Automatic Repair from working. All these may lead to the error message: automatic repair couldn’t repair your PC on Windows 11.
1. Click Advanced Options.
2. Click Command Prompt.
3. Type the command below and hit Enter.
systemreset -factoryreset
4. Select the Keep my files option.

5. Click Cloud download. This option will ensure you reinstall a new copy of the operating system, which may be the better choice if the version currently on your computer is faulty.

Step 6: Follow the wizard to complete the reset. Note that this will take a while, and your computer will restart several times.
Run Automatic Repair Smoothly
When automatic repair couldn’t repair your Windows 11 PC, our shared solutions are your best options to fix the problem. We have listed this fixes in order of simplicity, however, you may start with whichever you find the most appropriate.
Note that you may boot into Safe Mode to try some of these solutions.
Please tell us in the comment section what solution worked for you.
FAQ
Hardware malfunctions, software conflicts, damaged system files, and other difficulties can all result in an automated repair cycle. There might be more underlying reasons if you have already updated your RAM and hard drive and the problem persists.
It may vary, but generally, you may expect it to last between 5 minutes and 2 hours.